Soup is Good Food
Hi there! This is my first entry here at the Food Docs since Chase invited me join her as a contributor. You can read a bit about my history with food here.
Alrighty, then! Let's get down to it.
One of the basics in my kitchen, indeed in any kitchen, and one of the first things I ever learned to make, is chicken stock. And as I am not only too cheap and have better standards than to buy the canned stuff at the grocery (though I have), it is, more importantly, nowhere near as tasty or as healthful as it is if you would make your own. And it's really easy too, if you've got a few hours to spare, with minimal pot-tending required. A lazy Saturday or Sunday afternoon would do just fine. You're just hanging around anyway, aren't you? And it makes your house smell really good to boot.
The ingredients:
That's it! How easy was that? Notice that there was no salt added up to this point. There's usually enough added to the soups you make from this that I never add it when I make the stock.
Now you have a beautiful half-gallon, probably more, of homemade chicken stock. You can make some soup with it right now, which I heartily recommend, or freeze it for later use in any quantity you like. I usually freeze mine in 4-cup portions, which is just fine for two bowls whenever I get the urge for some good soup, which is about every other day.
Here are some things you can do with it:
Chicken soup is one of the best things in the world. Make it your own, with whatever you have on hand. You can't ever go wrong.
Alrighty, then! Let's get down to it.
One of the basics in my kitchen, indeed in any kitchen, and one of the first things I ever learned to make, is chicken stock. And as I am not only too cheap and have better standards than to buy the canned stuff at the grocery (though I have), it is, more importantly, nowhere near as tasty or as healthful as it is if you would make your own. And it's really easy too, if you've got a few hours to spare, with minimal pot-tending required. A lazy Saturday or Sunday afternoon would do just fine. You're just hanging around anyway, aren't you? And it makes your house smell really good to boot.
The ingredients:
- Some chicken. It could be a whole fryer chicken, some leg and thigh pieces, some drumsticks, or even just some bone-on, skin-on whole chicken breasts, or a combination of all of those. Two or three pounds is about enough. And, if you're like me, take those little wing tips and necks and gizzards and such that you throw in the freezer for just these times and toss those in too.
- A few unpeeled carrots, washed and chopped in half
- A few stalks of celery, also just chopped in half or thirds to fit into the pot. It's fine to leave the leaves on.
- An onion or two, skins on, cut into halves or quarters
- A bay leaf or two
- A good sprinkle of peppercorns
- A few good sprigs of parsley
- Throw all the ingredients into a good sized pot and fill with cold water, about 1 1/2 or 2 quarts (six to eight cups). If your ingredients fill about 3/4 of your pot up, just fill the pot almost to the top with water. That's about the right proportion. This is not rocket science, just cooking.
- Place the pot over low heat and bring slowly up to a simmer. This is the only not-even-hard, but longish part of the process. It might take 30-45 minutes, depending on how big your pot is. The point of all this is that you want to slowly bring it to a simmer to extract all the flavor out of all the ingredients as you bring the water up to heat.
- Once it gets up to the point where you just see the faint bubblings of the simmer, you will notice some icky, grayish, foamy scum forming on the surface. Not to worry. Just get yourself a slotted spoon or something with holes in it, skim it off and discard it. This stage may take up to ten minutes or so.
- After all the scum (it's really just protein molecules or something) is gone, just let it all simmer at that really low point for about 2-2 1/2 hours. Never, ever bring it up to a full boil thinking that it will get done faster. It won't. Not only will your stock have less of that wonderful, rich chickeny taste, but it will make the end product cloudy rather than you ending up with that beautiful, golden color of a well-made stock.
- After the time is up, strain the chicken and vegetable pieces out and let cool for a bit. Discard the vegetables (or save them: I used to add these to our dog's food and she had the shiniest coat ever) and, when cool enough to handle, pull the chicken meat from the bones and store separately. Strain the stock through a fine sieve or colander to remove any other particles.
- Chill the stock overnight. If you live where it's cold in the winter
(like me), stick the pot outside or in your garage overnight. The fat will rise to the top and solidify, and the next morning you can just pick it right off in chunks with a spoon. (If you make matzo balls, make sure to save some of this schmaltz for those. Otherwise, discard it.)
That's it! How easy was that? Notice that there was no salt added up to this point. There's usually enough added to the soups you make from this that I never add it when I make the stock.
Now you have a beautiful half-gallon, probably more, of homemade chicken stock. You can make some soup with it right now, which I heartily recommend, or freeze it for later use in any quantity you like. I usually freeze mine in 4-cup portions, which is just fine for two bowls whenever I get the urge for some good soup, which is about every other day.
Here are some things you can do with it:
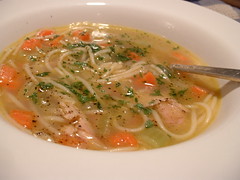
- Basic Chicken Noodle Soup: Dice up some onion, carrots and celery and saute in a teeny bit of oive oil for five minutes. Add the chicken stock, bring up to a medium simmer and cook for 15 minutes. Add the noodles of your choice and cook, partially covered, for another 15 minutes or until noodles are done. (If you use spaghetti noodles or something similar, break them in pieces before adding. Rice would take at least 20 minutes.) Add as much of the reserved chicken meat as you like, either chopped or just torn into chunks, at this time too. Taste for seasoning, add some salt if needed, crack some freshly ground black pepper over, sprinkle with parsley and serve.
- Mexican chicken soup: Bring the stock up to a simmer, add some drained black beans, drained canned or frozen corn, a can of undrained diced tomatoes (these even come in a Mexican style) and the reserved chicken meat. If I have zucchini I add that too. Garnish with sliced green onions, diced avocado, shredded cheese (cheddar or a Monterey Jack blend), and chopped cilantro. Instead of crackers I like to crumble some good tortilla chips in mine. Oh, and hot sauce, of course.
- Italian tortellini soup: Simply cook your cheese or meat tortellini in the simmering stock until done. Grate some Parmesan cheese over it, and sprinkle with parsley and some freshly ground pepper.
- Oriental chicken soup: Put a few slices of fresh ginger into your simmering stock (you will remove these later.) Add some sliced bok choy and your chicken, and some soba (or other) noodles if you like. Garnish with green onion sliced on the diagonal, cilantro, bean sprouts, and finish off with a few drops of dark sesame oil.
Chicken soup is one of the best things in the world. Make it your own, with whatever you have on hand. You can't ever go wrong.
| Permalink | ![]()
![]()


